An indispensable attribute of a woman is jewelry.
They come from precious metals, with and without natural stones, from artificial materials. They are also factory-made and original do-it-yourself crafts. Today's workshop is dedicated to creativity.
Modern stores represent a wide range of sewing accessories and their components. Hand made in Russia is popular.
DIY brooch
The technique for making such a brooch is simple. The materials used are not rare. Suitable for decorating clothes, handbags, interiors, gift wraps.

Materials and tools: felt color of baked milk, felt green, threads (it is better to use a mouline thread), vintage copper button, decorative fastening pin, scissors, paper, pencil, needle.

Stage 1
The figure suggests a template. Petals and a leaf for a future flower brooch are cut out on it. It is required to make 3 petals and 1 leaf. A pattern is made of paper.
Stage 2
The paper pattern is superimposed on the felt. 4 items are cut from it. All vary in size.
Stage 3
Two large petals have a round core. In the smallest petal in the center, cruciform lines are cut.
Stage 4
Mouline thread and a needle manually sew decorative veins. The seam is simple. The larger the petal, there is a larger line for a brooch with your own hands.
Stage 5
A decorative pin is sewn on a green leaf.
Stage 6
The leaves are superimposed on top of the leaf in turn. The last will be the smallest of them. A vintage button is sewn by hand. She holds together all the resulting product.
Brooch - ready! Wear it with pleasure!
DIY satin ribbon brooch
This is a beautiful volumetric flower. She will not go unnoticed! You can decorate a dress, a hat, or your desktop computer with a brooch to cheer you up.

Materials and tools: satin ribbons of two colors, scissors, candle, matches, tweezers, thread, needle.

Stage 1
A ribbon 10 cm long is cut off. The ends of the ribbon are melted by the candlelight. This will protect the fabric from shedding in the future.
Stage 2
The upper corner is wrapped with tweezers down. A bisector is drawn with a needle from the lower corner of the triangle (the triangle is divided into two equal) and the fabric is pulled together with a thread.
Stage 3
The left side of the tape performs the same manipulation. You will get a small elegant bud.
Stage 4
A new bud is made from a new piece of tape 10 cm long. The left and right corners are bent down. A simple seam is manually laid along the bottom edge. The thread is pulled together and a new larger bud is obtained. The previous petal is inserted inside the new one.
Stage 5
All subsequent petals simply bend into a charming shape that resembles the natural shape of a rose flower. In total, you need to bend 13 petals from satin ribbons for a brooch with your own hands.
Stage 6
At the end of the work, satin leaves are sewn to the base of the rose.
The shape of a beautiful tea rose for brooches can be made in the second way

Stage 1
Used tape length 12 cm in the amount of 14 pieces. A piece of satin ribbon first bends with both edges toward the center.
Stage 2
Then - again from the edges and towards the center.
Stage 3
The petal is fixed with a thread. And flips over. On the front side of the folds of the fabric should not be visible.
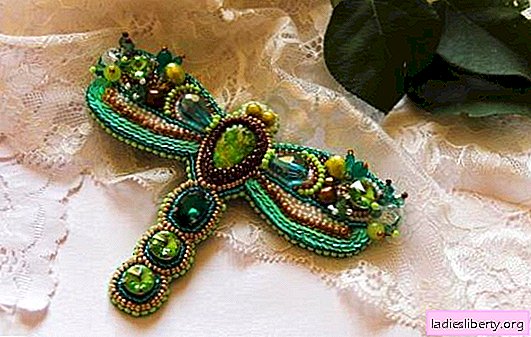
DIY bead brooch
Brooch with an emphasis on antiquity. The composition is unique in an unusual combination of natural malachite stone and artificial beads.

Materials and tools: malachite stone cabochon, dense fabric, beads of different colors and sizes, artificial leather, cardboard, decorative pin, glue that dries instantly, threads, simple and beaded needle, scissors, pencil.
Stage 1
The stone is glued with glue to the fabric.

Stage 2
The largest beads are used for the first row of beads. First, 2 beads are taken and sewn to the fabric near the stone itself. Then - again two. So until the very end, until the beads form an oval near the natural stone.
Stage 3
Through the first row of beads, the thread is pushed again. The whole structure is stretched for reliability.
Stage 4
The second row of beads is sewn not inside the first, but inside. A different color of the small item is used.

According to the same pattern: 2 beads. At the end, you must definitely tighten the second row of beads with a new thread.
Stage 5
The third row of beads is located outside the very first row. Here everything is done in a familiar technique.
Stage 6
At this stage, the excess tissue onto which the stone was glued and the beads sewn is cut off.
Stage 7
Back side design. For this we need blanks. The resulting brooch is taken with his own hands and placed on the skin. An oval is drawn around the skin with a pencil. It is cut further with scissors.

The same oval is made of cardboard with an allowance of 5 mm.
Stage 8
A cardboard oval sticks to the brooch. On it is a decorative pin. Further, holes are made in a leather oval for inserting a pin. And the oval made of leather also sticks.
Stage 9
After the glue has dried, it's time to decorate the brooch further. Already familiar technique adorns the edge. This time, the needle pierces the very first row of beads and comes out at the leather edge. So a new row of frames is made.

Stage 10
The resulting bead is braided with new small beads. It is sewn on one bead in two. And then - five beads of a different color around each, as in the picture.
It turned out a wonderful brooch!